有人安裝X86安卓在SD卡上嗎

S11M 開WIFI 下續航力到底多少 ? 袋機WAKE UP要多少秒??

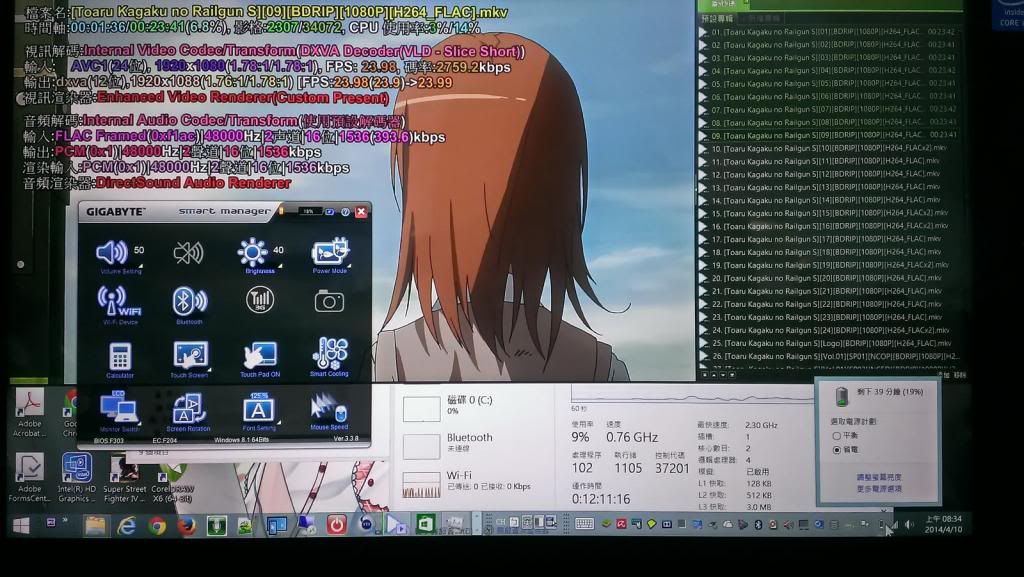
我之前實驗開WiFi連區網的電腦看1080P的影片,應該可以達到4個小時(用省電模式+螢幕亮度開40%)
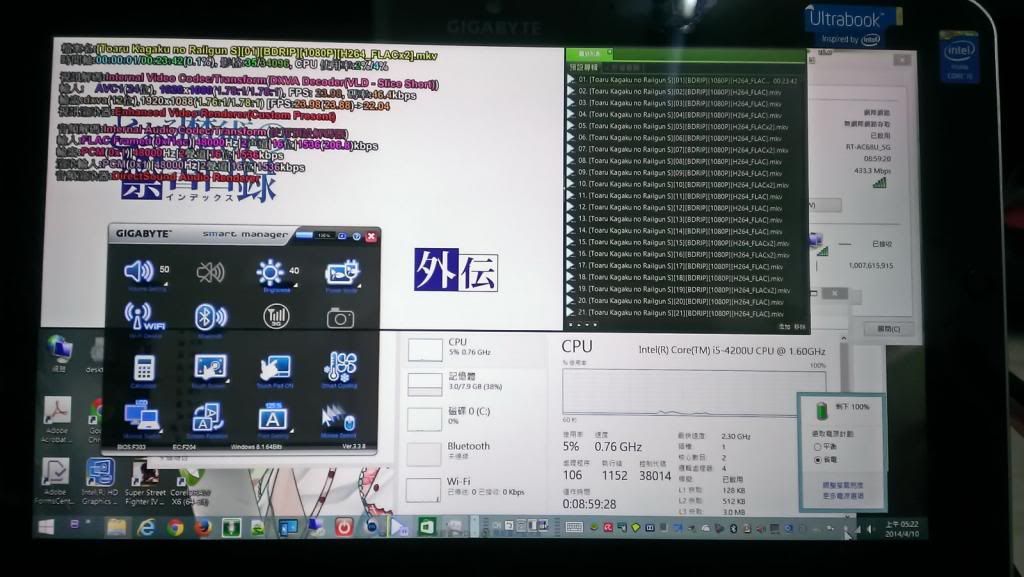


播到第9話時只剩19%電力了


S11M 為何只能開機到DOS 下?? 是因為EFI BIOS ??

可能是我這個USB 3.0隨身碟有問題(用USB 3.0的隨身硬碟就很正常);之前買回來在格式成EXT3的格式時突然就離線,又讀不出來;最後用該隨身碟公司其他型號的隨身碟低階格式化程式後才又讀得到,最後就變成只有在Windows 8.1裡插入才能讀得到,開機前插的話進Windows 8.1後,裝置管理員裡會出現不明裝置,但把隨身碟拔起來再插進去就又正常了......


S10M 網友說法開 wifi 可能 5.5hr 但 wake up 5sec 太慢.
我的 5年前 SX 使用HD Z530 wake_up 3~4sec ..但是現在平板要求應該是馬上 wake up .

我的S11M也是一樣從睡眠或休眠模式醒過來也是5秒左右

nanpan wrote:
我之前實驗開WiFi...(恕刪)


S11M wake up 要如此久?? 是因為使用 HD ?

surface Pro wake up 2 sec ...


http://www.mobile01.com/topicdetail.php?f=163&t=3841326&p=2

andy2000a wrote:
S11M wake up 要如此久?? 是因為使用 HD ?

surface Pro wake up 2 sec ...

它是用128GB的SSD,只是記憶體我自己換成8GB而已

況且S11M只是一台可以把鍵盤拿掉的小筆電,有2個全尺寸的USB(2.0+3.0各一個),也有全尺寸的HDMI和VGA....
畢竟對需要效能和環境多變的人來說,使用上會比Surface Pro系列機種方便不少
對我而言也沒差那幾秒鐘

基本上它就是一台PC,也可以把Android x86裝在USB隨身隨上,只是它內建的MicroSD的讀卡機BIOS讀不到就是了
(但是外接的USB讀卡機+MicroSD記憶卡BIOS就讀得到......只是誰要接一個尿袋來用平板啊!)

只是目前來看Android x86 4.4.2 RC2裝在S11M的USB隨身碟上會有:

1.無法待機關閉螢幕......(這個已經有修正方法)
2.聲音有點小
3.螢幕無法自動翻轉(可以自己裝翻轉的APP解決)
4.藍芽無法用來傳輸檔案,但可以A2DP傳輸音樂
5.開機比Windows 7還要慢
6.無線WiFi硬體是802.11AC只能跑150mbps(Windows 8.1可以跑433mbps)
7.雖說只執行單一程式時效能很好,但不能同時做太多事情,因為USB隨身碟效能快不起來
nanpan wrote:
它是用128GB的S...(恕刪)


S1185 v.s. S11M 除CPU外續航力有差異嗎?
記得技嘉有出擴充電池

如果都是 core I5 平板也都使用 SSD下, 沒道理 surface Pro 和S11M 有差,
不過 S11M 應該無法使用SD 只能使用 microSD 吧.


內建的MicroSD的讀卡機BIOS讀不到
=> 會不會內建的MicroSD的讀卡機 在bios下沒有 DRIVER?
taiwan2008 wrote:
S1185 v.s. S11M 除CPU外續航力有差異嗎?
記得技嘉有出擴充電池

續航力其實就看電池容量多大和CPU的耗電量就大概已經決定它的最高續航力了,其餘使用者的習慣才是它能用多久的主要因素;
擴充電池又沒有出給S11M用的


如果都是 core I5 平板也都使用 SSD下, 沒道理 surface Pro 和S11M 有差,
不過 S11M 應該無法使用SD 只能使用 microSD 吧.

對...只有內建MicroSD的單一讀卡機而已(其實還內建有一個可以插SIM卡的插槽)

內建的MicroSD的讀卡機BIOS讀不到
=> 會不會內建的MicroSD的讀卡機 在bios下沒有 DRIVER?

就算不是那因素,也不是使用者能解決的,就看技嘉願不願意把那功能做出來

nanpan wrote:
續航力其實就看電池容...(恕刪)


關於S1185電池續航力一事? (第1頁) - GIGABYTE - Mobile01
www.mobile01.com › 筆記型電腦 › GIGABYTE
2013年7月8日 - 9 篇文章 - 4 位作者
經與技術單位確認,S1185並未預留擴充電池設計,因此後續亦不會有擴充電池推出


目前S1082與S1080 / S1081的擴充電池規格相同

好像 S1082 S1080 S10M S1081 都使用同樣擴充電池 .

S1185 改變設計所以沒法用擴充電池 , S11M ??

GIGABYTE 其實應該統一下, 這樣全都能增加續航力吧,除非他覺得買 core I5 都
不在乎 電池續航力
現在不知哪台win8平板可以把Android x86安裝在Micro SD卡上的?

若真的不行~~
不知有沒有辦法在不破壞即有EMMC或SSD還原磁區下安裝Android x86?
畢竟裝在內建的EMMC或SSD裡跑起來速度也會比較快~~

jun17 wrote:
現在不知哪台win8...(恕刪)


google find some information


Android-x86 Installed on SD-Card in 10 Steps
Posted by Indra Gunawan at Sunday, January 30, 2011
As we already know, Android-x86 project is a project to port Android open source project to x86 platform. Basically it could runs on any x86 machine but many people use it on Netbook computer. That’s also what I did on my ASUS EeePC T101MT.

Asus EeePC T101MT comes with dual boot Windows 7 Starter and ASUS Express Gate (based on Splashtop). It's so risky to install Android-x86 or any other Linux based distribution to hard drive because it has hidden recovery partition that we doesn't want to mess with it.

In this case, I use 2 GB SD Card to store Android-x86 2.2 OS that I installed from bootable flash drive and modified it's GRUB configuration so even we setup Card Reader as primary boot device from BIOS, we still able to boot to another OS on hard drive from GRUB menu.

In fact, this is the safest way to install (not live session) Android-x86 without messing up your configuration.

How We Could Achieve This?!

Requirement:

UNetbootin, Flash Drive, SD Card and Android-x86 2.2 ISO Image.
BIOS that capable to boot from Flash Drive and Card Reader.

Installation:

The detail about installation process has perfectly described here. But in order to accomplish our purpose in this tutorial, please follow this steps:

Follow the instruction about how to make Android-x86 bootable Flash Drive using UNetbootin on that link. The point is, you should make a bootable media (CD-ROM or Flash Drive) from Android-x86 ISO image.
Before we start, put your SD Card into your Card Reader and keep your Android-x86 bootable Flash Drive plugged-in.
Restart your Netbook and enter BIOS Configuration Setup and make sure HDD Boot Order similar to this: Flash Drive –> Card Reader –> HDD.
Boot your Android-x86 Flash Drive and enter installation procedure.
Caution: When you chose installation partition during the process, use Card Reader (your SD Card) as target partition. Please notice that Card Reader drive usually recognize as sdc1 FAT32 Card Reader.
Format your SD Card as FAT32 (don’t chose another) and select “Yes” when you asked about GRUB installation.
If asked, make 512 MB user data image and 1024 MB fake SD Card image. You may customize this value as you want.
After reboot, re-enter BIOS Configuration Setup and make sure your Card Reader at the first boot order.
If your Windows partition is not listed on GRUB menu, don’t worry! Just boot into Windows (don’t forget to change your boot order to HDD) and edit menu.lst (GRUB’s Configuration) located on SDCardDrive\grub\menu.lst and add this line:

title Windows 7 Starter EeePC

rootnoverify (hd1,0)

chainloader +1

Change the title as you want but please note that I use rootnoverify (hd1,0) and not rootnoverify (hd0,0) as told by lot’s of example, because in my configuration, when we boot from Card Reader, my Card Reader drive became the first drive on system (hd0,0). So it’s necessary to change those value to (hd1,0) which means, my Windows bootable partition located on second harddrive at the first partition. Here’s my complete menu.lst for example:

default=0

timeout=5

root (hd0,0)


splashimage=/grub/android-x86.xpm.gz


title Windows 7 Starter EeePC

rootnoverify (hd1,0)

chainloader +1


title Android-x86 2.2 (HDPI)

kernel /android-2.2/kernel quiet root=/dev/ram0 androidboot_hardware=eeepc acpi_sleep=s3_bios,s3_mode DPI=240 SRC=/android-2.2 SDCARD=/sd/sdcard.img

initrd /android-2.2/initrd.img


title Android-x86 2.2 (MDPI)

kernel /android-2.2/kernel quiet root=/dev/ram0 androidboot_hardware=eeepc acpi_sleep=s3_bios,s3_mode DPI=160 SRC=/android-2.2 SDCARD=/sd/sdcard.img

initrd /android-2.2/initrd.img


title Android-x86 2.2 (Debug mode)

kernel /android-2.2/kernel root=/dev/ram0 androidboot_hardware=eeepc acpi_sleep=s3_bios,s3_mode DEBUG=1 SRC=/android-2.2 SDCARD=/sd/sdcard.img

initrd /android-2.2/initrd.img

After all set, make your Card Reader as your first boot device and you can enter your Windows session by picking first list on GRUB menu.

Please remind that do this at your own risk, I’m not responsible for any data lost or hardware damage because of any failure. Just be careful and backup your data first if you’re not sure you can do it right! ;-)
大大:
你Android x86 4.4.2 RC2是裝在usb隨身碟上跑

還是已經裝在硬碟了啊???

Android x86 4.4.2 RC2對硬體的支援度如何呢???

像是wifi開關、3g、螢幕觸控功能那些~


不知道是否可以分想一下步驟~

也想要安裝android x86到我的s1082上~


s1080跑BS模擬器雖然可稱順暢~但是玩遊戲時機器一直很熱~風扇猛吹~

謝謝~
基本上我是裝在USB 2.0的隨身碟裡,我測試過我的S11M如果要用Android x86 4.4.2 RC2的ISO檔開機來安裝,要使用USB的光碟機;因為我用UNetbootin來把ISO檔放進隨身碟,雖然S11M開機時可以看得到,但確無法安裝;因為我有USB的DVDRW光碟機,所以我就直接燒成光碟片再安裝(因為等我找到解決不能安裝問題的時間絕對比用USB光碟機安裝的時間還長)

而為了不要那根長長的USB隨身碟影響使用觀感,所以買了"SanDisk CZ33 Cruzer Fit USB 黑豆隨身牒 32GB"來用,畢竟它的小體積雖說比不上內建的MicroSD可以看不出來,但起碼不至於影響外觀太大

安裝方式其實就和網友差不多,[Android x86]安裝在SD卡上

記得把BIOS裡的<OS Secure Boot mode>的選項改為[Win7 / Win8 No secure],其餘的差別就只是我用的是實體USB光碟機+光碟片來安裝

至於硬體的支援度...我錄了一段影片!

文章分享
評分
評分
複製連結

今日熱門文章 網友點擊推薦!