For this Halloween, I've decided to challenge myself to make my own costume instead of buying something generic. I ended up choosing to make Daft Punk's Helmets (both Guy-Manuel and Thomas Bangalter). The process was quite interesting, so I will be sharing it here (since the golden helmet was much harder and took more time, this post will mainly be about that process).
Of course, to start any build, the first thing we need to do is find a good, simple, and free STL file to print. The best option that fits my 3D printer was this design by Bendiger (fair warning, the Guy Manuel helmet was exponentially harder). The file splits the helmet itself into multiple pieces, so I highly recommend getting zipties to hold the holes together before you use a permanent adhesive.
Something like this will do, just make sure most pieces sit flush...

Once all the pieces were attached via zipties and everything fit as it should, I used clear epoxy to bind the seams together. This stuff is incredibly strong, even stronger than the bond the plastics have on itself (so if the helmet were to be broken, the plastic would probably break before the bond does).
Now that the pieces are bonded, we can start the process of making it look more seamless. The secret here is a lot of sanding, filler primer, and Bondo/woodfiller (I recommend woodfiller more after having to struggle with Bondo). To start, I sanded the first layer with low-grit sandpaper, then after that, I hit the entire thing with filler primer. Once the primer dries, I look for large gashes or seams and fill them up with Bondo. This process does many things.
1.) It roughs up the surface first and removes grooves formed by the 3D printer.
2.) filler primer will fill most small holes and lines
3.) Bondo/wood filler can cover up the remaining larger imperfections.

The gameplay loop here is to sand (going up in grit with each cycle), filler primer, bondo/woodfiller until the surface is smooth enough to be slightly glossy.
For the Guy Manuel helmet, it has a very strange shape for the visor, which means it will require thermoforming sheets of 1/16" clear PETG sheets to achieve that shape. To quickly explain what a thermoformer does, it basically heats a sheet of plastic, then you drop the plastic on top of the mold, and a vacuum underneath will suck all the air out so that the plastic forms into the shape of the mold. The concept is incredibly simple and could easily be achieved via an oven and a few pieces of wooden planks slapped together. This also means that a mold would be needed, which was also provided in the STL files (the same process for smoothness and bonding will apply for this mold).

I did not have any pictures of the mold, but you can see it on the bottom right
Unfortunately, it would not be an interesting build if something didn't go horribly wrong!!!! After spending numerous hours on prepping the mold... the thermoformer destroyed it...


However, my failure could hopefully save anyone who tries this on their own. There were 3 main reasons why this failed.
1.) My wall thickness on the print was too thin; the plastic above was heated enough that it melted through the thin wall layer, which gave it the weird brain-looking pattern (infill pattern was gyroid, best infill pattern)
2.) The vacuum former itself only had one hole in the center of my mold... my hollow mold...
3.) My mold and plastic sheet were made out of the same plastic, which explains why it would melt in the first place. People online say that forming PETG over PETG is fine, so I suspect most of the issue is the two listed above.
Since the original mold now looks like a bowl, I needed something stronger and completely foolproof. Due to my time constraint at the time, the solution I came up with was to CNC a piece of wood. So I quickly glued a few pieces of spare wooden planks together and let the CNC router cut out the mold that way (the CNC router I used was actually not designed for something 3D, so that was also incredibly close whether or not it would've worked).


There are 3 ways you could tint this visor: either dye it, spray paint it, or get a professional to apply car tint to it. I went with spray paint, using the VHT Night-Shades spray paint for automobiles, being super careful to apply even coats and apply just enough so you could actually see out of it. (The spray paint method is not perfect; up close, imperfections are still visible, dying is the best method for even tint.)
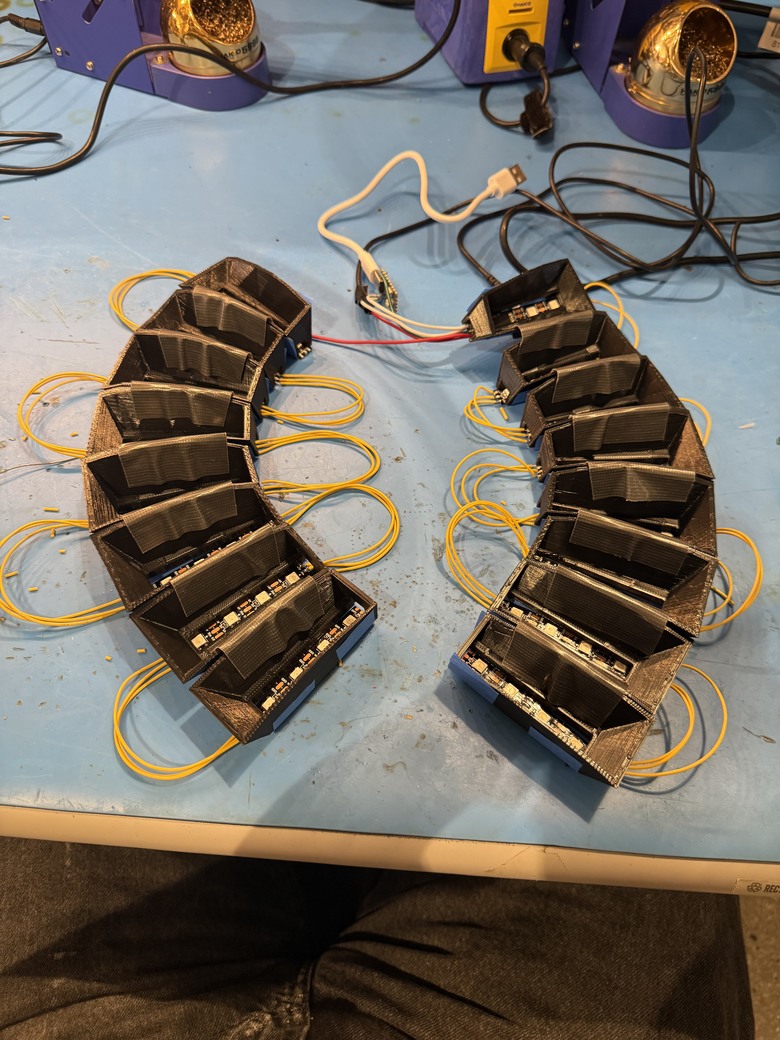
Next thing to tackle was the electronics; due to time restraints and laziness, I only did the electronics for Guy Manuel. The file provides 8 cells for the LED strips, with each cell holding 4 LEDs; this totals up to 64 LEDs, including the other side (I used the WS2812B 60LEDs/m strips). Since I wanted to carry this around with me, it will have to be powered via a battery bank, which means knowing the Amperage this amount of LEDs draw is important. Since the strip is 5V and uses 0.3W when using all 3 colors, using Ohm's Law shows that it draws 3.84A for 64 LEDs (0.06 individually). This means that at most I can mix two colors per LED using a 5V3A battery bank. This could differ depending on how many LEDs were used and what battery bank was used.
For the actual build, it is quite simple. On the LED, we have 3 pins: ground, 5V, and data. There are arrows on each strip indicating where the current flows, so we just have to solder start to end for every 4 LED segments.
At the start of the arrow, we connect the 5V and ground to the battery bank. There are 2 ways to do this, one is with a breakout board, and the other is to cut up a USB cable you no longer need (I just cut up a USB cable).


if you end up cutting an USB cable like me, you will see a lot of random fuzz which you can ignore, and if you do not see a black cable, then the wires accompanying the other colored wires are most likely your ground.
Now that the ground and 5V are handled and connected to the battery bank, we can solder the data pin and ground of the LED strip to your microcontroller of choice (make sure they share common ground! not doing this could blow your parts). You could also add a button if you want to be fancy and be able to switch through modes, with the button ground and data both going into the micro controller.

All there is to do left is to flash the microcontroller and run the code!
Now that the hard work is all done, all there is left is to somehow fit all this into the helmet with a lot of duct-tape.