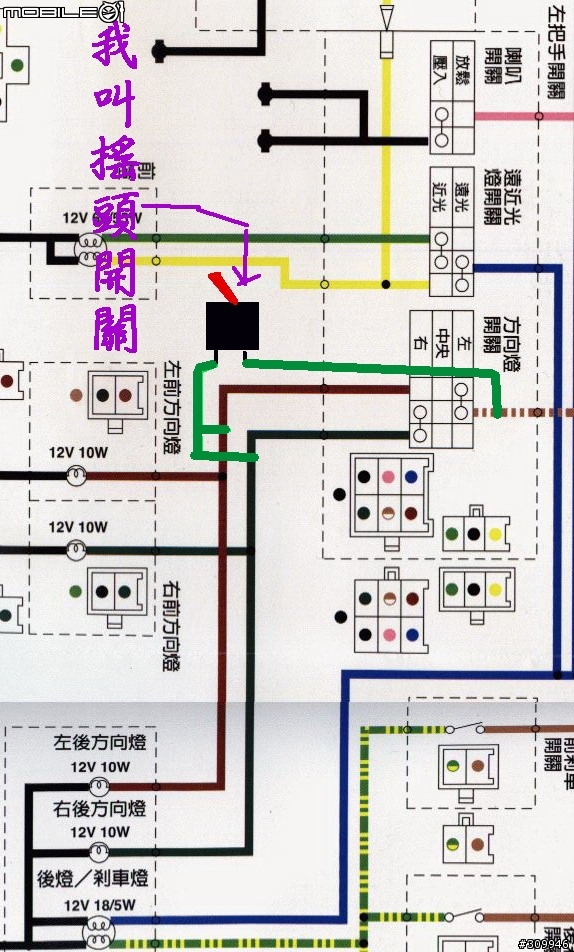
所以勒~我就開始了我的紀錄之旅
首先,把左右那兩顆螺絲拆開
![[分享]暨-圖多](http://attach.mobile01.com/attach/200709/mobile01-e172451366331ad336e0ecb3726eef66.jpg)
接下來是圖正中間那顆(龍頭右邊也有一顆)
所以外面總共有四顆螺絲需要拆
![[分享]暨-圖多](http://attach.mobile01.com/attach/200709/mobile01-8f216cc9bdb76a85f6d44231cdba5b92.jpg)
大拇指往下後方施力,中指往前上方施力,第一次都會比較緊
 ~喂~別鬧了
![[分享]暨-圖多](http://attach.mobile01.com/attach/200709/mobile01-5770cea2d92ef78dedc189ef260bd26f.jpg)
然後就鬆開了
![[分享]暨-圖多](http://attach.mobile01.com/attach/200709/mobile01-39db42a0b87ea26ee8455c766b42ab7b.jpg)
左邊也是一樣的方法
![[分享]暨-圖多](http://attach.mobile01.com/attach/200709/mobile01-8c5f43fc36a91b43dfab35dc147cf714.jpg)
整個開了
![[分享]暨-圖多](http://attach.mobile01.com/attach/200709/mobile01-2b9d1aaf26436a8f89d321ba506551ae.jpg)
然後請將整個殼以下方為支點,往前方推,然後就可以把前殼取出了
![[分享]暨-圖多](http://attach.mobile01.com/attach/200709/mobile01-850fe838dc3b618adfb9197e0cdef334.jpg)
慢著!你的方向燈還沒拔!!!不想亮了是嗎
![[分享]暨-圖多](http://attach.mobile01.com/attach/200709/mobile01-f8946677a2ea60e2562e6e3218c4a710.jpg)
![[分享]暨-圖多](http://attach.mobile01.com/attach/200709/mobile01-21bc4f101abab5dc9f40072dfce65750.jpg)
大拇指向下刁然後就可以拉出了
![[分享]暨-圖多](http://attach.mobile01.com/attach/200709/mobile01-cdbbe7d7c410cf638a77e711e5db2e93.jpg)
接下來拆正上方那顆螺絲
![[分享]暨-圖多](http://attach.mobile01.com/attach/200709/mobile01-bc7e7a589399fbf34d053629ec601db0.jpg)
很裡面那邊有一顆,拿手電筒就可以看到拉(抱歉圖太黑)
![[分享]暨-圖多](http://attach.mobile01.com/attach/200709/mobile01-a759abb95e0e5f57737e2091742dccc5.jpg)
對稱位置也有一顆,所以總共有三顆
對了!螺絲記得要收好,不見我可不負責

![[分享]暨-圖多](http://attach.mobile01.com/attach/200709/mobile01-1f6836fa27dd0ae5bf8d67d475519d97.jpg)
接下來大拇指向上頂著,食指中指向下壓,整組就往下了
![[分享]暨-圖多](http://attach.mobile01.com/attach/200709/mobile01-069cee8dc88e0a1f7011f873df2fbdb0.jpg)
然後拆掉方向燈閃爍器(往上拉就出來了)
![[分享]暨-圖多](http://attach.mobile01.com/attach/200709/mobile01-c42ffb263e0ffdab725739aee54cc8de.jpg)
記得別往上硬拉,往前方約20度就會看到此種景象
![[分享]暨-圖多](http://attach.mobile01.com/attach/200709/mobile01-335300ed03da3d5d01e005007223c8cf.jpg)
然後把上面覆蓋的皮往下褪去

(迷之聲:誰巴我的頭,好痛...不鬧就是了嘛!)
![[分享]暨-圖多](http://attach.mobile01.com/attach/200709/mobile01-3eb135a12510cea800221601b923ab64.jpg)
然後轉一轉之後就離開拉
![[分享]暨-圖多](http://attach.mobile01.com/attach/200709/mobile01-31c69057c1dfb9a19c0972759d40655d.jpg)
接下來你會看到一條黃線上面有包著綠色辦透明的東西,還有後面紅色的接頭(6P的)
![[分享]暨-圖多](http://attach.mobile01.com/attach/200709/mobile01-534c99934d27b4fcb8fe8ff20e2c0d34.jpg)
紅色
![[分享]暨-圖多](http://attach.mobile01.com/attach/200709/mobile01-c9da74e34b74b486f59eb2fa6ae5b4c8.jpg)
黃線包綠皮
![[分享]暨-圖多](http://attach.mobile01.com/attach/200709/mobile01-2935b6834d9bf60eaf2c26c7af5965c1.jpg)
此日的主角,請自備線,然後從方向燈,然後以並聯的方式拉出兩條線
![[分享]暨-圖多](http://attach.mobile01.com/attach/200709/mobile01-308601d5b9c6d36a53617d4681378ea9.jpg)
綠皮拔開後拔開前
![[分享]暨-圖多](http://attach.mobile01.com/attach/200709/mobile01-36a283c043a83dcd2e45762c270e118b.jpg)
拔開後,接著就往兩邊施力,就離開了
![[分享]暨-圖多](http://attach.mobile01.com/attach/200709/mobile01-0ae7b03e00ecec0ec1e2e4afa9dd9659.jpg)
接了燈泡之後的樣子,最後面還有補充資料,先往下看吧
![[分享]暨-圖多](http://attach.mobile01.com/attach/200709/mobile01-2ba5be31a5bbde81c2f0f9f1eaccd926.jpg)
接著把殼裝回去吧,先不用鎖,放著就可以了
接著拿著你拆下來的儀表版去你房間吧
![[分享]暨-圖多](http://attach.mobile01.com/attach/200709/mobile01-44491fcc8e4b82de603d96271e434094.jpg)
右邊的洞(本來沒有洞,可是高起來那部分原來就有了)
就說原來就有了嘛..原廠真摳,連加條線接個燈泡都不肯

![[分享]暨-圖多](http://attach.mobile01.com/attach/200709/mobile01-6d25c6e31b32a74ddb05e6ea92dda24f.jpg)
另外一邊也是一樣
![[分享]暨-圖多](http://attach.mobile01.com/attach/200709/mobile01-a616a1cc109bb16f60e717582671acef.jpg)
接著拆油量指示器,用鉗子把螺帽轉開吧
![[分享]暨-圖多](http://attach.mobile01.com/attach/200709/mobile01-0a50732923c6347c4666600ea9390dd8.jpg)
兩邊往下後施力
![[分享]暨-圖多](http://attach.mobile01.com/attach/200709/mobile01-48b2aca6e012b409c77ea3eccd999df4.jpg)
另外一邊也是一樣
![[分享]暨-圖多](http://attach.mobile01.com/attach/200709/mobile01-d411150428c483874c190ceb507645a3.jpg)
然後蓋子就拿起來了
![[分享]暨-圖多](http://attach.mobile01.com/attach/200709/mobile01-b2799b4f089a8edbe822feeecf99a32a.jpg)
接下來非常重要,關係著你的指針會不會斷掉
先以中指跟大拇指押著最上方跟最下方
![[分享]暨-圖多](http://attach.mobile01.com/attach/200709/mobile01-cbb7dedf4acd2b0e83b5a5a8ef9b14c4.jpg)
反過來的時候頂著,別讓整組掉下來
食指跟指針剛好在一起那是視差,別去碰他阿
![[分享]暨-圖多](http://attach.mobile01.com/attach/200709/mobile01-b11899753290eadd69834d970a0728f1.jpg)
然後在撐著的情況下把這兩顆螺絲拆掉
![[分享]暨-圖多](http://attach.mobile01.com/attach/200709/mobile01-576418338c369723f2411f60731b1004.jpg)
然後把殼往上拉起來,左手一樣撐著
你有沒有覺得我的儀表版少了什麼?
答對了,就是機油更換指示器,因為我為了要讓儀表更亮,所以整組廢了
我都是習慣看里程數換
![[分享]暨-圖多](http://attach.mobile01.com/attach/200709/mobile01-b6b6c71bc15dd38634d4c95523a297c5.jpg)
接著去買卡典西(好像是這樣叫吧)
我也不確定要叫什麼
![[分享]暨-圖多](http://attach.mobile01.com/attach/200709/mobile01-21a519e4a424762f8d4662d39d7a9b54.jpg)
西德?反正就是透明塑膠然後有黏性,顏色隨便你挑
![[分享]暨-圖多](http://attach.mobile01.com/attach/200709/mobile01-9980ee5b04e6731bbcdf084e1e2d8288.jpg)
接著翻過你的正面,在你想要的地方用刀片把漆刮除,記得別整個切過去,一個洞在那邊很奇怪的
至於美觀與否就要看個人造化了
![[分享]暨-圖多](http://attach.mobile01.com/attach/200709/mobile01-af04a939b151426742f050c1f0840228.jpg)
另外一邊也是一樣(背面好像也要刮的樣子,不確定,太久之前弄得)
反正弄到他可以透光就對了
此張圖為我貼上西得之後的樣子
![[分享]暨-圖多](http://attach.mobile01.com/attach/200709/mobile01-d8f9b98cfc61388d55a9e88bcf1db33e.jpg)
由於我廢掉機油更換指示器,所以我就把貼紙貼上去,讓他一直顯示綠色的
![[分享]暨-圖多](http://attach.mobile01.com/attach/200709/mobile01-45717baf8b9294123c211569e8026978.jpg)
轉過來照照燈
恩~不錯,光有透出來(廢話,早就弄出來了,現在指示拆開來教學而以)
![[分享]暨-圖多](http://attach.mobile01.com/attach/200709/mobile01-26e2fa778d98f64f792c4511638edb26.jpg)
對了,補充一下,本來勁風光儀表登裡面只有左下還有右上兩顆而已
我又挖了洞塞了兩顆(左上和右下)
![[分享]暨-圖多](http://attach.mobile01.com/attach/200709/mobile01-7a66414e3f78b05ff8597f51d78e8991.jpg)
接下來是重頭戲,挖洞吧
先用小螺絲挖出一個小洞,
然後在慢慢挖大,之後在用挫刀慢慢磨,記得別磨太大,剛剛好就好(燈泡規格在最後面)
![[分享]暨-圖多](http://attach.mobile01.com/attach/200709/mobile01-64b22bba2d5044592d25853e5433f188.jpg)
挖完之後的右邊
![[分享]暨-圖多](http://attach.mobile01.com/attach/200709/mobile01-7bb71fc9379d8d54a475cdb4b0d0d09e.jpg)
左邊
![[分享]暨-圖多](http://attach.mobile01.com/attach/200709/mobile01-bc399da18521292035487eeff4b8b436.jpg)
這張圖是給想要幫儀表裡面增亮的人兄看的
只要在原來的線路上串上兩顆燈泡就OK了
我是把他全部LED化,這樣比較省電,燈泡規格是T10
記得買散光行的,不要買集中型的
這樣才不會某幾點亮,然後其他地方暗暗的
![[分享]暨-圖多](http://attach.mobile01.com/attach/200709/mobile01-7b47fc67e7a42e00666eb8eeff23ea91.jpg)
接下來的內容是給愛騎車亂跑,又怕被家人看到里程數詢問說為什麼亂跑的人專用,
也讓想要買二手車的人知道,店家說"他的車騎了幾公里而已"這句話的真實性
首先先把圖中夾子夾住那個拔起
![[分享]暨-圖多](http://attach.mobile01.com/attach/200709/mobile01-9590cb018ca122ecc9ed2e93c66be2ca.jpg)
起來了
![[分享]暨-圖多](http://attach.mobile01.com/attach/200709/mobile01-7706352544d97521b797ab3caabe0dbd.jpg)
然後把整個拿起來
![[分享]暨-圖多](http://attach.mobile01.com/attach/200709/mobile01-069d47654ed554148d09b1a1992297ee.jpg)
拿起來之後的樣子
![[分享]暨-圖多](http://attach.mobile01.com/attach/200709/mobile01-8eb15225398484bb8f8caed6d939d19d.jpg)
有沒有看到C型環?
![[分享]暨-圖多](http://attach.mobile01.com/attach/200709/mobile01-df2bdd45507c3a667c5435ea2c982b33.jpg)
拿起你的鉗子,上面碰著中間那根,下面碰著C型環的沒有接合處那邊
![[分享]暨-圖多](http://attach.mobile01.com/attach/200709/mobile01-d962836f39b5707015c71ff3f9b341ea.jpg)
稍微施點力就離開了
![[分享]暨-圖多](http://attach.mobile01.com/attach/200709/mobile01-b1c1f1fd8eb18f7e2d57640de0034645.jpg)
彈簧跟C型環記得要收好,同一句話:不見一概不負責
![[分享]暨-圖多](http://attach.mobile01.com/attach/200709/mobile01-07e26c3de2efc17e642c541f79ba4e70.jpg)
由上往下看
![[分享]暨-圖多](http://attach.mobile01.com/attach/200709/mobile01-bb85d4d481f44fc3fb7b36cc57e4f242.jpg)
抽出之後會看到嘿嘿的根橘色那個
當你調完里程數之後記得幾件事
1.圖中橘色的那個,他有高有低,記得高的地方要卡在上圖那個縫裡面
2.組裝的時候照原來方式接回去
3.記得裝回去的時候所以圖中左邊平平那個要往同一個方向(也就是朝前,眼睛看的那個方向)
![[分享]暨-圖多](http://attach.mobile01.com/attach/200709/mobile01-58ef6520799b26cb574bce9d64986f97.jpg)
說實話,我對我磨的表面不怎麼滿意,相信版上有很多手工比我細的
![[分享]暨-圖多](http://attach.mobile01.com/attach/200709/mobile01-eacb4ed408600de495e2039b3bf24856.jpg)
完成之後,就把你的線插進你的洞裡面
![[分享]暨-圖多](http://attach.mobile01.com/attach/200709/mobile01-df1eae29db58655eb911458e6742eb0b.jpg)
這邊也一樣
![[分享]暨-圖多](http://attach.mobile01.com/attach/200709/mobile01-e5e73af1343580b53565f1d5d8820223.jpg)
記得別接錯邊,要不然等你出去的時候你就知道了
PS:記得只能買LED的燈,因為瓦數太大的話會影響到方向燈閃爍器,
至於規格好像是T5?熊熊忘記了,反正就是買比那個洞小的就對了
![[分享]暨-圖多](http://attach.mobile01.com/attach/200709/mobile01-1eceb18d546b73a9e517f416f0e5b9bc.jpg)
對了~燈泡還需要燈座,去車行要要看應該都有,有些車行習慣燈拆下來都會裝成一箱
裡面有很多寶貝的呢!!
想看大圖點此相簿

 求求你囉~
求求你囉~ )
)


