筆者是第一次在網站PO開箱文 還請網友們不吝指教
此次是筆者首次自己完成度達到這麼高的東西 所以想跟各位網友分享
LM3886+機箱
![[開箱]LM3886+機箱](http://attach.mobile01.com/attach/201109/mobile01-57637c3868a33a6c2eea2e9f16292897.jpg)
這是剛送來的樣子
![[開箱]LM3886+機箱](http://attach.mobile01.com/attach/201109/mobile01-b2a148e7fd354e4ec23f75d6fe7470fc.jpg)
出處
![[開箱]LM3886+機箱](http://attach.mobile01.com/attach/201109/mobile01-9f5af47d2dc2f7344b13f07c9443b85e.jpg)
裡面的東西
![[開箱]LM3886+機箱](http://attach.mobile01.com/attach/201109/mobile01-95646614de86a555ddc99711d92b2886.jpg)
分裝得很好 不會互相刮傷
![[開箱]LM3886+機箱](http://attach.mobile01.com/attach/201109/mobile01-837b9f72c3abfa17911a2be88ec1b9af.jpg)
開關套件
![[開箱]LM3886+機箱](http://attach.mobile01.com/attach/201109/mobile01-6747e09e4b94b6630cf86c7b5e64dc7f.jpg)
面板
![[開箱]LM3886+機箱](http://attach.mobile01.com/attach/201109/mobile01-rnffe208e95317ad21ef5b0721b444b33f.jpg)
背板
![[開箱]LM3886+機箱](http://attach.mobile01.com/attach/201109/mobile01-7f548790c5d402a6c8c7b11ec7e61dff.jpg)
完成後的樣子
![[開箱]LM3886+機箱](http://attach.mobile01.com/attach/201109/mobile01-cec6a1731006c69186985ac842afe68d.jpg)
銀邊腳座 很有質感 底部還有止滑的效果
![[開箱]LM3886+機箱](http://attach.mobile01.com/attach/201109/mobile01-0db8370ef39cf5846f9c7a14eb4d8c2a.jpg)
裝上後的背板 還有A.B 輸入可以切換
![[開箱]LM3886+機箱](http://attach.mobile01.com/attach/201109/mobile01-338aea4c62278c813d46cc5b9c5a72fc.jpg)
照一下箱子
![[開箱]LM3886+機箱](http://attach.mobile01.com/attach/201109/mobile01-aff67b53a7e8cbec00a98dbc3cd57d36.jpg)
PT-40 這裡筆者是教學文一樣編麻花
![[開箱]LM3886+機箱](http://attach.mobile01.com/attach/201109/mobile01-8a38100095c04878937f4d1ca439785f.jpg)
然後捲變壓器下面
![[開箱]LM3886+機箱](http://attach.mobile01.com/attach/201109/mobile01-48b8e641c8beb82326e67a2299ae86e9.jpg)
接下來換到3886登場啦 這是筆者自己手洗的板子
如果使用他們的廠製版的話 是藍色的 會比較鮮豔
想起我跟我同學2個人總共花了8個小時來完成 洗版 鑽洞 焊接 還真是累人呀
不過真的是很有成就感的作品
聲音很不賴 溫暖 高低音控制力都很強
這邊拍完才發現 上面拍出來的效果都霧霧的 下面換了一台好一點的相機
還請多多包涵

![[開箱]LM3886+機箱](http://attach.mobile01.com/attach/201109/mobile01-c7b06619c87f0e41bb0cdf59b8e66d77.jpg)
拉出來的可變電阻 花了好久才弄好
底板
![[開箱]LM3886+機箱](http://attach.mobile01.com/attach/201109/mobile01-87090e366df714f681c3fdd58d0ecbc1.jpg)
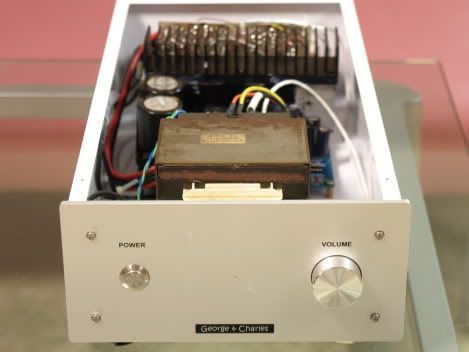
把上面的線都拉完了 整理得很乾淨
![[開箱]LM3886+機箱](http://attach.mobile01.com/attach/201109/mobile01-877e83a29ad2f824ac957a269682e6c7.jpg)
真的很棒 換個角度再來一張
![[開箱]LM3886+機箱](http://attach.mobile01.com/attach/201109/mobile01-f25876a65678bcc23782f91882916871.jpg)
![[開箱]LM3886+機箱](http://attach.mobile01.com/attach/201109/mobile01-7c8b778034c84938272ab3b3f61b3ef8.jpg)
把板子放上去 一開始如果想說 拉線拉不好的話 就這樣把它蓋著吧
不過花了這麼多心血的機殼 當然是要做透明的

![[開箱]LM3886+機箱](http://attach.mobile01.com/attach/201109/mobile01-765d3d0e34f3e672be34295ed9ea9511.jpg)
實際運行 原本在3886板上的 LED燈移到面板中間 是很溫暖的白色
![[開箱]LM3886+機箱](http://attach.mobile01.com/attach/201109/mobile01-46d1c068d396b42ed1ca2d51d10d03d4.jpg)
整套下來大約花了4000多塊
也是滿有成就感的
有興趣的網友 可以參考
http://gc.digitw.com/


 )
)